
 iOS Developer
RatesMate is a simple yet powerful currency conversion app. RatesMate includes currency rates for over 150 currencies and includes tipping customs for 65 countries.
RatesMate was designed and built as a portfolio app. An app which would further me as an iOS developer and allow me to see the full design, implementation and release stages of an iOS project. More specifically, I could use it as an opportunity to try using RxSwift in a full app implementation.
The reason I decided to create a currency conversion app boils down to a few things:
The app would make use free REST APIs. I wanted the only financial investment to be the Apple developer account fee.
Updating information asynchronously over the networking, then propagating the received data throughout the app is a perfect use case for the Rx paradigm.
The tipping unique selling point of the app isn't implemented in too many currency conversion apps that I have seen.
It would be an app I would make use of whenever I go abroad.
I aimed to keep the UX design simple and focus heavily on good code practices, architecture and design patterns. A summary of these implementation details will be discussed in the following sections.
As mentioned in the previous chapter, one of the main driving forces behind RatesMate was the desire to use RxSwift in a full app environment. The entirety of the app makes use of the reactive programming paradigm - networking, data flow and even the chaining of animations.
Paired with RxSwift, I made use of RxCocoa. RxCocoa contains a bunch of useful Cocoa extensions to provide "Rx-y" functionality - such as being able to functionally use the response from a URLSession through an observable, or publishing text property updates to UILabels through bindings.
Both RxTest and RxBlocking are included in the same repo as RxSwift and RxCocoa. These are used extensively in my unit tests, to efficiently and correctly verify that modules of my code are working as intended, allowing me to confidently refactor in the future.
Other Rx related libraries used were:
To help with debugging in both the development stage and in production, I used the CocoaLumberjack logging framework as I am familiar with it.
Evaluating calculations that the user has entered required two dependencies. The calculator had to be able to evaluate a string of operations (e.g. "1 + 2 / 3") and be able to deal with very large denominations of currency, since some conversions would be in large amounts (An example being converting Euros to Vietnamese Dong). For the first requirement, I used Expression, an iOS library that can evaluate a string and output a double value. For the second requirement, I used Swift-Big-Number.
However, due to Expression outputting the value as a double as the largest datatype, I had to use a modified version of Expression that included the BigNumber library, which could then evaluate an expression and return a BigNumber datatype instead. The BigNumber library also required some modification to fix some accuracy issues, so I forked both of these repos and stored them on my own GitHub. I updated the podspecs and created my own private podspecs repo, so that I could use CocoaPods to load private repos.
I opted for Firebase as my backend technology, using a combination of both the database and cloud functions. I load from 2 APIs, one for country info (REST Countries) and one for currency exchange rates (CurrencyLayer). These are loaded into the database by two cloud functions (Cloud functions are JS code executed upon a GET request to an address), which is then pulled down to the app. These functions are executed by Cron jobs hosted by another free service.
Using Firebase in this approach may have been overkill, since I'm not making use of many of the features Firebase has to offers, but I struggled to find a free cloud computing service that would let me host my own endpoint, without having to run my own server. I suppose I now get Firebase analytics without any extra hassle.
In terms of iOS SDK APIs, I made use of both UIKit (Pretty much guaranteed in any iOS project) and StoreKit.
All of the above dependencies were integrated using CocoaPods (some through a private podspec as mentioned above), as Firebase requires installation using CocoaPods due to statically linked libraries. I began the project using Carthage, which is my preference. I usually setup Carthage to not build the checkouts and to instead incorporate the checkouts into a single workspace, allowing me to control what is built for each target.
During the design phase, I designed wireframes in Sketch to get an idea of what I wanted the app to look like. I also designed the app logo in Sketch.
I used Swiftlint, which adds custom Xcode warnings/errors defined by a set of rules, aimed at keeping your code style consistent across the codebase - e.g., throw a warning if an mutable (var) variable is never mutated or an error if a function body is over a certain number of lines.
I managed the app store metadata and released builds to TestFlight using fastlane. This dramatically sped up the process of releasing a beta/release build and allowed me to clearly store the app store metadata under version control. The app store screenshots were produced using fastlanes snapshot & frameit.
The project was maintained in source control with Git on the GitLab service.
When it came to deciding on an architecture, I narrowed down to two choices: the traditional Model-View-Controller pattern or Model-View-ViewModel.
I had used both architectures in projects previously, MVC in smaller personal projects and MVVM at my previous workplace. The argument for each was fairly even.
One of the most popular reasons to avoid MVC to avoiding is ViewController bloat, but this only really becomes an issue if MVC is implemented badly. Functionality should still be separated from view controllers into separate units (Handlers, service classes, extensions etc). MVC starts to go awry when the requirements for functionality to be separated into new units is not clearly defined - this can have disastrous consequences on large code bases, causing tight coupling between view logic and business logic. This issue is much easier to minimise in a single-developer project as the decisions of separation are more consistent, provided the developer is disciplined in following a decoupled structure.
MVVM helps with this separation by completely separating the view logic and the business logic. The View module of MVVM (Which includes the ViewController) simply displays data from the ViewModel. An excellent rule I use when developing in an MVVM architecture is to always design the ViewModel as if I was going to build a MacOS app, identical to the iOS app, and use the ViewModel to power the AppKit based ViewController.
Since MVVM is popular in apps that use RxSwift (partly due to the data flow from the ViewModel to it's owner ViewController being trivialised), I decided to opt for MVVM as any company I make work for in the future would likely use RxSwift and therefore likely use the MVVM architecture.
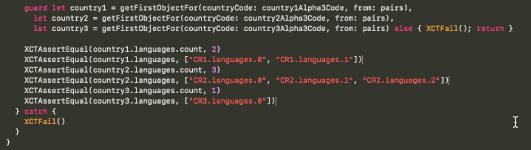
To exemplify how the ViewModel and ViewController exchange data, I have created two code snippets of a simple ViewModel/ViewController pairing from my app. The creation/constraining of UI elements has been removed from these classes since that is not the focus of the snippet. I've also updated it to use UILabels/UIButtons rather than a using a UITableView to reduce complexity.
A couple of things to point out:
closeAction is an example of the Action library. Once the closeButton has been tapped, the closeButton won't be usable until sceneCoordinator.pop().asObservable().map { _ in } emits an event.One of my favourite aspects of the app (in terms of programming) is the SceneCoordinator service class. While not the same as the traditional coordinator pattern found in iOS (where there are child coordinators, one for each navigational flow), the SceneCoordinator still maintains the separation of navigation logic to display logic and couples closely with business logic - meaning you can write better & faster unit tests.
The coordinator is used to transition between scenes (ViewControllers) using whichever transition type specified (Root, Push, Modal, pop) by holding a reference to the current navigation controller and manipulating it whenever the scene needs to change.
This modified design pattern was first presented to me in the RayWenderlich RxSwift book.
The second major design pattern implemented in the RatesMate app was favouring dependency injection over my previous experience of singletons.
In total, there were three dependencies that were passed throughout the app:
Each of these dependencies is simply a protocol, with concrete implementations being passed between the classes. This means that if I were to switch database services, I would only need to update where the instance is first created and passed - rather than (if it was a singleton) changing many references to the singleton instance throughout the app.
It also makes the app much cleaner to test. If I was using singletons, I would need to update the shared instance to return a mock class when executed within an XCTest case. Not only does this mean you're affecting production code, but it also means that you need to make the state of the mock class mutable in order to update what the mock behaviour should be.
With dependency injection, I can keep the mock dependency class within the test bundle (nowhere near production code!) and pass that into the ViewModel initialiser when creating the ViewModel in unit tests - which also allows me full access to the mutable mock dependency class. Excellent!
Having only previously used Autolayout and "UI building" in storyboards/xibs, switching to using programatic constraints was a daunting prospect. For the first few screens of the app I carried on with the familiarity of using storyboards, but soon realised that there are a large amount of companies that do their constraints completely programatically and without a storyboard due to the issues surrounding them (Source control diffs, magic strings for segues etc). Once I had realised that this was the case, I decided to switch to building the rest of my app using programatic constraints.
This task was nowhere near as daunting as I originally thought! Building the constraints can become verbose pretty quickly, but I believe people have already fixed this kind of issue in some frameworks - I'll likely take a look at those for my next project.
One thing did annoy me when I first started programatic constraints though: translatesAutoresizingMaskIntoConstraints is so easy to miss!
The biggest issue, by far, was going into this project without a strong base knowledge of RxSwift - how it works, how to structure the app, what the operators do or even the errors that are common and how to fix them.
After struggling with Rx for the first screen, I decided that trying to progress further without having a good base knowledge of both the Reactive paradigm and the actual framework itself would be counterproductive and would compound bad habits into my coding. I took a step back and picked up the RxSwift book by RayWenderlich. I spent a week working my way through the material, performing the exercises and reading other materials around it. After that week, I moved back to the app and began work again.
The book helped immensely with understanding how I should structure my app. I learnt all the major operators and how to apply them, what the variety of traits do, and where to use them and more. The only thing that it didn't really help me with was the plethora of uninformative RxSwift specific errors that occur when writing code. Those were a matter of just writing enough RxSwift related code to figure out. An example of these errors is "Statement is ambiguous", which seems to usually be fixed by defining what type the parameters are and what type is returned by the closure.
I briefly mentioned the issue of math-related dependencies required in the technologies section. I required two dependencies - one for big number datatypes in Swift and one to execute math expressions. Since both of these dependencies operate as separate entities, I required a merging of the two. Doing so required learning about how to use Cocoapods with private repositories - I forked both of the repos (i had to have a private repo of Big-Number due to some precision issues), updated the dependency to add the returning of big numbers from the expression library (and fixed the precision issues in Big-Number) and updated the podspec file in each of those repos to a private name. I then created a private podspec repo containing these podspecs, which are then included in the list of pods when using Cocoapods.
The solution, in terms of implementation, was pretty simple and didn't require a large amount of work. I was, however, surprised by the lack of information on how to do this - I thought that using private pods would be a common use case in the industry.
My app was close to ready to launch on the week of May 25th. The week that GDPR came into action, if you don't remember. I spent a large amount of time reading over the legislation and what it meant for my app. Although I wasn't specifically gathering user information or using personal details, I do use pseudonymous analytic information/crashlytics in my app to track time spent on the app and improve the app. Under GDPR, this requires the users consent.
The solution I implemented for this issue was to show the user an alert dialog upon launch and ask for consent for analytics & crashlytics. While this isn't the best user experience, it does ensure that my analytics/crashlytics is enabled straight away in the app and allows users to immediately opt out.
A large amount of time was spent making small UX changes to accommodate for "less computer inclined" users. Ensuring the app is usable and intuitive for all users was very important to me.
An example of one of these changes is the border animation around the country flags on the calculator screen. After giving the app to a few non-tech oriented users, I noticed that they were struggle to understand how to change between currencies (by clicking on the country/currency flag), despite the younger audiences instantly understanding that clicking the flags would allow them to switch between currencies.
I had two options:
While my app is finished for now, there is still a large amount of functionality that I would like to add in the future:
This project was the first chance to experience the Codable changes from Swift 4.0 first hand. I had seen many, many blog posts discussing the new changes but hadn't used them yet. The simplicity of converting a JSON structure into models is fantastic. Being able to easily override a property to convert it into another is awesome. For example, in my JSON I have a property of subregion. In my Codable model class, I take the subregion and convert it into a new property of Continent with only an additional line of code in my model.
One of my biggest gripes of being an iOS developer is having to use Xcode. While AppCode is technically an option, I find it's support for Swift not as good as when used with Obj-C. The Xcode team are making changes, but these seem to fall flat a lot of the time. Large refactoring functionality was introduced in Xcode 9, but never seems to be available and crashes Xcode often. During writing unit tests, I decided to try out the editing changes for Xcode 10 - the multi-line editing is GREAT! (but has also available in most other IDEs for a while now)
The BaseTrip for allowing me to use their information on tipping data pro-bono.
RayWenderlich for their extremely helpful RxSwift book and other general iOS tutorials.
The RxSwift community - most notably the Slack channel
REST Countries for maintaining country information for free.
